Internal approvals dashboard: permissions, audit trail, undo
Plan and build an internal approvals dashboard with AI tools, with clear permissions, a reliable audit trail, and safe ways to revert decisions.
What this dashboard needs to solve
An internal approvals dashboard exists for one reason: decisions should be clear, consistent, and easy to defend later. When approvals live in chat threads and spreadsheets, the decision might happen, but the proof and control usually don’t.
When teams approve things in scattered places, a few problems show up fast:
- People approve the wrong version because files changed mid-thread.
- “Who said yes?” turns into guesswork after someone leaves or deletes a message.
- Sensitive info gets shared too widely because the tool has no real access control.
- Fixing a mistake becomes awkward, slow, and political.
Permissions and logs matter more than a fancy UI because they reduce risk in quiet ways. A clean screen helps people move faster, but permission checks stop the wrong person from approving, and an audit trail proves what happened. If you ever need to answer “why was this approved?” you want one source of truth, not five screenshots.
Revert is the other must-have, and it needs a strict meaning. “Revert” should mean: record a new action that changes the current state back to a prior safe state, while keeping the full history. It should not mean deleting history, hiding mistakes, or editing the past to make it look clean.
The goal is simple: reduce risk without slowing people down. A good dashboard lets the right person approve in seconds, blocks everyone else automatically, and makes every step easy to trace.
Define the approval workflow in plain terms
Before you build an internal approvals dashboard, write the workflow like you’re explaining it to a new teammate in one minute. If people can’t agree on the simple version, the UI will turn into a patchwork of exceptions.
Start by naming the decisions that need approval and who owns each one. Keep ownership clear: one role should be accountable for the final call, even if others give input. For example, “Spend over $5,000” might be owned by Finance, while “Add a new admin user” is owned by Security.
Next, define actions and states using words everyone already uses. Most teams can start with five actions: request (create), approve, reject, cancel, and escalate.
Be explicit about what’s “pending” versus “final.” Pending means it can still change without cleanup. Final means it has effects you must track (access granted, money spent, records updated). If “Approve” triggers real changes, treat it as final, and make “Escalate” and “Cancel” unavailable after that point.
Finally, decide what “on time” means. If delays matter, set a simple SLA: when to remind, when to escalate, and when to time out. Example: remind after 24 hours, escalate after 48, and mark as expired after 7 days so it doesn’t sit in limbo forever.
Roles and permissions you can explain in one minute
If your internal approvals dashboard needs a long training session, the model is too complicated. Start with roles that match real behavior, then write rules people can repeat from memory.
A simple set that works for most teams:
- Requester: creates a request and can see its status.
- Approver: can approve or reject requests assigned to them.
- Admin: manages settings, assigns approvers, and can fix bad data.
- Auditor: read-only access to requests and the full history.
Keep the rules just as plain. Requesters can create and view their own requests. Approvers can view requests in their queue and record decisions. Admins can view everything and manage access. Auditors can view everything, but can’t change anything.
One edge case to decide early: can the same person request and approve? For most companies, the safe default is no. If someone is both requester and approver, require a second approver or block approval and flag it. This prevents rubber-stamp approvals and makes audits easier.
Temporary access is another common trap. Contractors should usually be treated as requesters or auditors, not admins. If you must grant higher access, make it time-limited and reviewed, and remove it automatically when the contract ends.
A quick example: a contractor submits a “purchase new tool” request (requester). A team lead approves it (approver). Later, finance reviews the records (auditor) and sees who approved, when, and from which account. If an admin needs to correct an assignment mistake, they can, but that action should also be logged.
Data model: keep it boring and reliable
A good internal approvals dashboard lives or dies by its data model. A fancy UI can hide problems for a week. Bad data will haunt you for years.
Start with a small set of core records and make every action a stored fact, not a sentence in the interface. If someone asks, “Who approved this and when?”, you should answer from the database, not from UI text.
A simple shape that usually holds up:
- Request: id, type, title, requester_id, current_status, created_at, submitted_at, closed_at (optional), search_tags (optional)
- Decision: id, request_id, actor_id (approver), decision (approve/reject), reason, decided_at
- Comment: id, request_id, actor_id, body, created_at
- Attachment (optional): id, request_id, uploaded_by_id, filename, storage_key, created_at
- Status history (optional but useful): id, request_id, from_status, to_status, actor_id, changed_at
Keep status values limited and meaningful. Most teams only need: draft, submitted, in_review, approved, rejected, canceled. Add timestamps you’ll actually use later (submitted_at, decided_at, closed_at) so reports are easy and you avoid guessing based on “last updated.”
Plan for search early. You will almost always filter by requester, approver, status, and a date range. That means indexing those fields and storing requester_id and actor_id everywhere they matter.
If your first version came from an AI tool, watch for “magic” status fields or decisions mixed into the request row. Fix it early, while the workflow is still simple, so the system can answer basic audit questions once real people start using it.
Step by step: building with AI tools without losing control
AI tools can get you to a working UI fast, but approvals features break when the rules are fuzzy. Write the rules in plain text first (who can do what, when, and what gets recorded). Then let the AI generate code from your rules, not the other way around.
A build path that keeps you in charge:
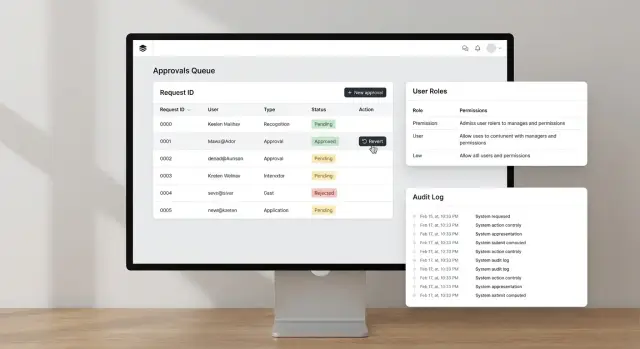
- Generate screens as separate, named pages: an approvals inbox (queue), a request detail view, an admin settings area (roles, groups, policy toggles), and an audit log view.
- Generate API actions next: create a request, approve or reject, revert (with constraints), and list audit logs with filters.
- Add one rules doc file in your repo and keep it updated. When a rule changes, update this file first.
- Ask the AI to generate tests from the rules doc: “Given role X, when action Y, then result Z.” Include at least one test for each permission boundary.
- Wire the UI to the API only after tests are in place, so the dashboard doesn’t rely on hidden UI logic.
After generation, do a cleanup pass. This is where many prototypes go wrong: unused endpoints and tables pile up, fields get vague names (like “status2”), and key audit data is set on the client instead of the server. Tighten it up so IDs, timestamps, and performed_by are always set server-side, and every state change writes an audit event.
Permission enforcement: where it must live
An internal approvals dashboard lives or dies on one rule: permissions must be enforced on the server. Hiding a button in the UI is helpful for clarity, but it isn’t security. Anyone can still call the same API if they can guess it, copy a request, or use browser tools.
Treat every request as untrusted. The server should check who the user is, what role they have, what resource they’re acting on, and what state it’s currently in (for example, you can’t approve something that’s already rejected).
For anything risky, use deny by default. Actions like revert, edit-after-approval, changing approvers, or exporting sensitive data should be blocked unless a rule explicitly allows them. This prevents accidental access when roles change, new endpoints appear, or an AI-generated prototype ships with missing checks.
A pattern that holds up:
- Centralize authorization in one place (middleware or a policy function), not scattered across endpoints.
- Require an explicit permission for each sensitive action, not just “is admin.”
- Require a reason for high-risk actions like revert or override, and store the reason with the event.
- Validate state transitions on the server so users can’t skip steps.
Example: a manager can view a request and approve it, but only a compliance lead can revert it, and only with a reason. If someone hits the revert endpoint without that permission, the server rejects it even if the UI was modified.
Audit trail: what to record so it holds up later
An audit trail is your truth when someone asks, “Who approved this, and why?” The goal is simple: you should be able to replay the story of a decision without guessing.
Log every meaningful event, not just the final approval. Keep each entry small and consistent, so it’s easy to search and explain later.
Record the basics every time:
- Who did it (user id, role, and if relevant, on behalf of)
- What happened (action name like submitted, approved, rejected, escalated)
- What it happened to (object type and id)
- When it happened (timestamp and timezone)
- What changed (before and after values, or a diff) and any stated reason
Make the log append-only. Never update or delete rows, even if a decision is reverted. The revert should be a new event that points back to the earlier one.
For non-technical reviewers, build an audit view that reads like a timeline: plain verbs, clear labels, and fast access to the related request. Add filters for date range, requester, and status changes. Avoid raw JSON unless someone asks for it.
Decide retention and export rules early. Be clear about how long you keep logs, who can export and in what format, whether exports are logged as events, and how you handle legal or privacy deletion requests.
Revert decisions: safe undo patterns
People will click the wrong button, approve the wrong version, or realize new info arrived too late. In an internal approvals dashboard, undo needs to be safe, visible, and hard to abuse.
The first rule: don’t edit history. Instead of changing an old approval record, add a new reversal entry that points to the original decision. That keeps the audit trail honest and makes it clear what happened and when.
When someone reverts, require a short reason. Make it mandatory, not optional, and store it with who reverted, when, and what they reverted. “Mistake” isn’t enough. Better: “approved wrong vendor quote” or “policy exception was revoked.”
Limit reverts with rules users can understand:
- Only specific roles can revert (for example, approver lead or admin).
- A time window (like 24 hours) unless escalation is used.
- Block reverts after downstream steps (paid, deployed, shipped).
- Require a second approval for high-risk reversals.
Also show the impact before confirming. A good revert screen names what will change: the request status, any tasks that will be reopened, notifications that will be sent, and whether related records (like access grants) will be removed.
Example: a manager approves an access request, but security notices it includes an external email. The revert action should flip the request back to “Needs review,” revoke any granted access, reopen the checklist, and log the reason so the next reviewer sees the full story.
Dashboard layout that keeps people moving
A good internal approvals dashboard should feel like an inbox. People should land, see what needs them, act, and leave without guessing. If users have to open every item just to learn its status, approvals slow down and mistakes rise.
Start with a simple top bar: search, time range, and a “My view” switch. Then put the queue front and center with three default tabs: Needs me, Waiting, Done. Keep the count visible so users trust they’re not missing anything.
Make each row answer the basics without a click: what’s being approved, current status, and the next required step. Add a compact “who, when, why” summary so accountability is obvious. If a reason is missing, show “No reason provided” instead of leaving it blank.
Risky actions need friction. For approve, reject, and especially revert, use a confirm dialog that repeats the key facts (item name, impact, and who will be notified). Include a comment box in the dialog so people don’t skip the why.
A simple table layout usually works best. Aim for columns like request (and amount or scope), requester, status, next step, due date, last action (who and when), and a one-line notes preview.
Don’t skip accessibility basics. Use high-contrast status chips, readable font sizes, and clear focus states for keyboard users. Every action button should be reachable by tab, and dialogs should trap focus until closed.
Common mistakes and traps to avoid
The fastest way to break trust in an internal approvals dashboard is to ship something that looks right in the UI but is wrong in the rules. AI tools can generate convincing screens and even “permission checks” that only hide buttons. That isn’t security.
The traps that show up most often:
- Relying on front-end checks only (a user can still call the API directly if the server doesn’t enforce permissions).
- Copying generated auth code without review (hard-coded roles, missing tenant checks, and admin bypasses are common).
- Letting users edit historical approval records (it destroys the timeline; use a reversal action instead).
- Logging only happy paths (denied actions and failed attempts matter when you investigate later).
- Shipping without role-boundary tests (you find out too late that a Viewer can approve, or an Approver can change settings).
A simple rule helps: past events should be immutable. If someone made the wrong decision, record a new event that reverses it, with who did it, when, and why.
Also log what didn’t happen. If someone tries to approve without permission, store the attempt (user, role, resource, reason). It helps you spot training issues, misconfigured roles, and real abuse.
Before release, run a few “try to break it” checks: a viewer tries to approve, an approver tries to change roles, an admin tries to approve on behalf of someone else, and a user tries to access another team’s requests.
Quick checklist before you roll it out
Before you invite the whole team, do one last pass like you’re trying to break your own internal approvals dashboard. Use real accounts, real data, and a fresh browser session (no admin cookies).
Run these checks end to end
- Log in as each role and try to do something you shouldn’t be able to do: open another team’s requests, approve without permission, or view admin-only settings. If the UI hides a button but the action still works, it’s not safe.
- Create one request, approve it, then revert it. Confirm the final status is correct everywhere (list view, detail view, exports) and that any side effects are reversed (notifications, downstream records, counters).
- Search and filters: test at least three queries people will actually use (by requester, by status, by date range). Verify totals match what you see when you scroll.
- Audit trail: open the log for that request and make sure it tells a complete story with timestamps, who did what, and the reason text. Look for gaps like “status changed” with no actor.
- Secrets and sensitive data: scan client code, configuration, and logs for API keys, tokens, and personal data you don’t need. Assume logs may be copied into tickets.
Example: a realistic approval story from start to revert
A startup has a vendor payment request: $8,400 for a design agency. The requester uploads the invoice, picks a cost center, and submits it in the internal approvals dashboard.
The system routes it to the Finance Approver (Maya). She opens the request and sees the basics first: vendor name, amount, due date, and what changed since submission. She checks the invoice and compares it to the purchase order.
Maya approves and adds a short note: “PO 1127 matches invoice. Paying on Friday batch.” The status changes to Approved, and the payment request becomes read-only for most users.
Later that day, someone notices the invoice had the wrong bank details. An Admin (Luis) investigates. He doesn’t edit the original approval record. Instead, he uses a Revert action that creates a new event: Reverted, with a required reason.
Luis writes: “Reverting approval: bank account mismatch. Vendor sent updated invoice.” The request returns to Pending, and the system routes it back to Maya with the new invoice attached.
When an auditor checks this a month later, they can answer four questions without guessing:
- Who approved it, when, and from which role
- What note was added at approval time
- Who reverted it, when, and why
- What the request looked like at each step (before approval, after approval, after revert)
That’s the difference between “we think it was fixed” and a trail that holds up.
Next steps: ship safely and improve over time
Start with a small, real slice. Pick one approval type that people already understand (like expense approvals or access requests) and ship it to a pilot group of 5 to 15 users. A focused release helps you catch confusing screens, missing permissions, and noisy logs before the whole company depends on it.
Before you code more, write the rules down as plain policy text. Keep it short enough that a manager can read it in two minutes, and specific enough that the code can match it. Be explicit about who can approve, who can override, what happens on timeout, and when an approval can be reverted.
When you’re ready to roll beyond the pilot, use a simple launch plan:
- Lock the permissions and roles model, then add new roles only with a written reason.
- Run a short security review focused on permission checks and audit trail logging.
- Do one bad-actor test: try to approve, undo, and view history as the wrong user.
- Define success metrics: time to approve, error rate, and how often reverts happen.
- Set a support path: who investigates if a decision looks wrong.
Treat logging as a product feature, not a backend detail. During the pilot, review a handful of audit entries with a non-technical stakeholder and confirm the history answers their questions without guesswork.
If you’re inheriting an AI-generated prototype that’s shaky on auth, logs, or deploy readiness, teams like FixMyMess (fixmymess.ai) can help diagnose and repair those gaps. They focus on turning broken AI-built apps into production-ready software, starting with a free code audit.
FAQ
What’s the first thing I should define before building an approvals dashboard?
Start by writing the workflow in one minute: what can be requested, who owns the final decision, and what “final” means. Keep actions and states small (request, approve, reject, cancel, escalate) so the UI stays consistent and the rules are easy to enforce.
Which roles do most internal approvals dashboards actually need?
A simple default is four roles: Requester (creates and tracks), Approver (records decisions for assigned items), Admin (manages settings and assignments), and Auditor (read-only history). If you can’t explain the rules from memory, you’ll end up with loopholes and inconsistent behavior.
Should someone be allowed to request and approve the same item?
Default to no, because self-approval quietly breaks accountability. If you must allow it, require a second approver or automatically route to an alternate approver and record that the requester and approver were the same person.
What data model works well for approvals and audits?
Keep it boring: store a Request plus separate Decision records, and treat each action as a saved fact with actor and timestamp. Avoid mixing “current status” and “who approved” into one row without history, because it becomes impossible to answer audit questions later.
Where should permission checks live so they’re actually secure?
On the server, every time. Hiding buttons in the UI helps prevent mistakes, but it doesn’t stop someone from calling the API directly. The server should check identity, role, resource ownership, and current state before it allows an approval, rejection, revert, or export.
What should an audit trail include so it holds up later?
Record who acted, what they did, what object it affected, when it happened, and what changed, plus the reason when relevant. Make the log append-only so you never “clean up” history; instead you add new events that explain corrections, including reverts.
What does “revert” mean in a safe approvals system?
Revert should create a new action that moves the current state back to a prior safe state while keeping all prior events intact. It should never delete or edit the original approval, and it should require a short, specific reason so reviewers understand why the reversal happened.
How do I prevent reverts and overrides from being abused?
Deny by default for high-risk actions like revert, override, changing approvers, and exporting sensitive data. Add guardrails like time windows, blocking reverts after downstream steps (paid, shipped, deployed), and requiring a second approval for the highest-impact reversals.
What tests catch the most common approval dashboard failures?
Generate tests directly from your written rules: “Given role X, when action Y, then result Z,” including at least one test per permission boundary. Also test state transitions (can’t approve rejected items) and log integrity (every state change writes an audit event from the server).
We inherited an AI-generated approvals app that’s shaky—what’s the fastest way to make it production-ready?
Get a codebase diagnosis focused on server-side authorization, state transitions, and audit logging, because AI-generated prototypes often look right while missing critical checks. FixMyMess specializes in repairing AI-built apps into production-ready software, starting with a free code audit, and most fixes are completed within 48–72 hours.